Showing posts with label Tricks. Show all posts

Wednesday, 21 December 2016

Trick To Run Trial Version Software For Lifetime

Hello geeks, technoroots is now back once again with all new cool tricks and latest updates of computer and cyber world. Today we are going to show you one cool trick which is extremely useful for the users who frequently use new software tools just like me.

Now a days, lots of new software and tools are being released everyday. but we can not purchase all of them because they cost a lot so we always end up using just the trial version of that software or tool and at the end of trial period you need to uninstall them. what if i tell you that you can use that trial version for the life time without paying any money. even after trial period gets expired. yes that's true my friend, today i am going to show you a cool trick which will allow you to use the trial version of any software for lifetime. so lets start.  

Follow Instructions to work this for lifetime

Tip 1: Note down the date on which you installed the software which you want to use lifetime

Tip 2: Once Trial of that software expires, you need to run that software from RunAsDate everytime.

Tip 3: You should not run software directly after trial expires. If you do so this trick will stop working.

How To Use RunAsDate Tools
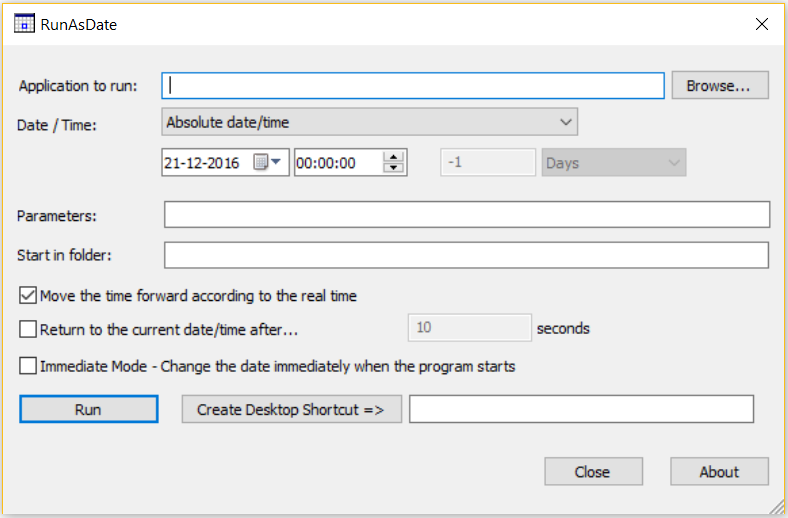

Step 1: download the RunAsDate tool. download now

Step 2: open RunAsDate from the downloaded zip file.

Step 3: Browse the application for which you want to run for the lifetime.

Step 4: Enter date and time on which you installed that application.

Step 5: Now click on Run to run your software. do this every time you want to run your application forever.

that's it guys now you can enjoy your favorite software for lifetime.


Sunday, 1 June 2014

Registry trick to allow you to continue receiving Windows XP updates

Even though Microsoft ended Windows XP support last April, you can apparently still get updates for the OS using a simple registry trick.

The trick relies on the fact that while Microsoft has ended support for XP it continues to support Windows Embedded PoSReady 2009, an OS based on the XP kernel, untill 2019. The registry key will trick Windows Update into thinking you’re actually running PoSReady 2009 and therefore you’re still entitled to updates. There’s no guarantee all updates will work perfectly since XP and PoSReady 2009 aren’t exactly the same OS. The trick only works on the 32-bit version of XP!


To reenable updates you simply need to create a registry key called “HKLM\SYSTEM\WPA\PosReady” and there create a Dword called “Installed” with a value set to 1. You can do this manually using regedit, or create a .reg file using notepad and paste in the following:
Windows Registry Editor Version 5.00
[HKEY_LOCAL_MACHINE\SYSTEM\WPA\PosReady]
“Installed”=dword:00000001
Then you can simply run the .reg file to add the values to the registry.
Once again, this is an unofficial hack, neither TECHNOROOTS or Microsoft is responsible when stuff breaks after using this registry tweak. Microsoft may patch this workaround at any time, besides, if you’re stil running Windows XP you should really consider upgrading to a more recent, more secure, constantly updated OS like Windows 7 or Windows 8.1

Tuesday, 25 February 2014

How to Send Profile Pics in Facebook Chat


Facebook is rolling out new features continuously. Recently they overhauled the complete profile view by enabling Timeline. Now they also enabled images in facebook chat. These images mean you can send profile pic of a facebook user in chat. The user may or may not be in your friend list. You need to have the User Id or Username of the user.


How to Send Profile Pics in Facebook Chat:


  • Login to your Facebook Account
  • Visit the profile of the user or group whose image you want to send.
  • Copy the Username or User ID from address bar.
  • Now in chatbox type he username or user id in following format: [[Username]] or [[User ID]]

For Sharing the picture of Mark Zukerberg or ladygaga type [[zuck]] and[[ladygaga]]

How to Dramatically Speed up Windows XP Installation Process

For those of you who frequent Installing Windows may often feel impatient, because the process which could take approximately 1 hour from start from formatting copying files and installation.
But in fact this installation can we shorten to less than 10 minutes. But I do not recommend for those of you who have old PCs. But if you insist you can try it with your own risk.

STEPS : 

1. Beginning the process of doing as usual, you boot from the CD Drive and run the formatting as usual. After the formatting and copying in DOS mode completed then the PC will restart and will continue the installation process with the mode GUI (Graphical User Interface) or user friendly GUI. See the picture below

2. Well at the time of this Installation GUI appears press SHIFT + F10, which will call the Command Prompt.
3. At the command prompt you type taskmgr and press ENTER to call the Task Manager.

4. After you click the Task Manager appears on the Processes tab and locates the Setup.exe 

5. from the process list. Right-click on setup.exe, and click Set Priority - < Select High. Task Manager Warning will appear , click Yes

6. After that you just close the Task Manager and Command Prompt and see its results.
Furthermore, let the installation process as usual. The time is guaranteed to be faster. Windows XP installation process you'll grow faster but depending on your processor speed.

Monday, 24 February 2014

How to create Autoresponder with Gmail

If you've ever sent an email to support Team, most likely you received an automatic reply vaguely related to your message. Using a new feature from Gmail Labs, you can create your own Autoresponder with canned messages feature in Gmail and use them as automatic replies.
If you're bored of typing out the same email reply every time someone emails you with a common question, now you can compose your reply once and save the message text with the "Canned responses" button. Later, you can open that same message and send it again and again.

Canned feature in Gmail added a new action for filters: "send canned response". If you receive many messages about the same issue and you have a standard response, create a filter that includes some relevant keywords and select an existing canned response. This should come in handy if some users continue to ask same question repeatedly.

How to creating Autoresponder with Gmail:

First Login to your Gmail account
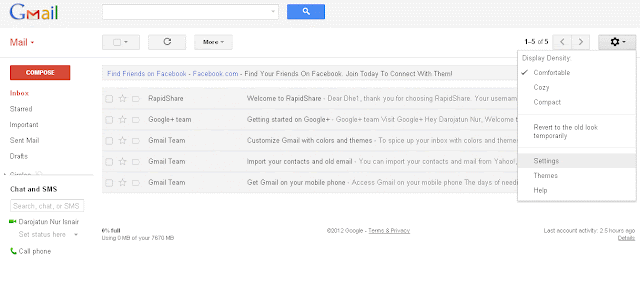
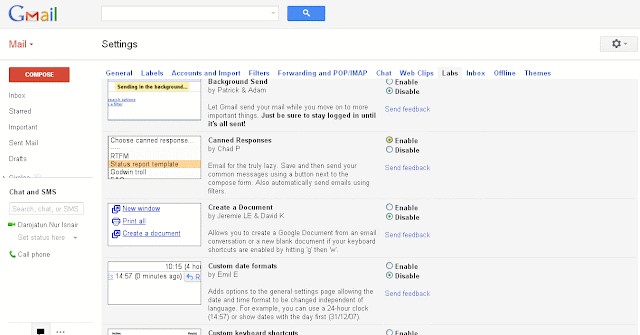
Go to setting and click tab Labs and check to enable Canned Responses feature than save it.


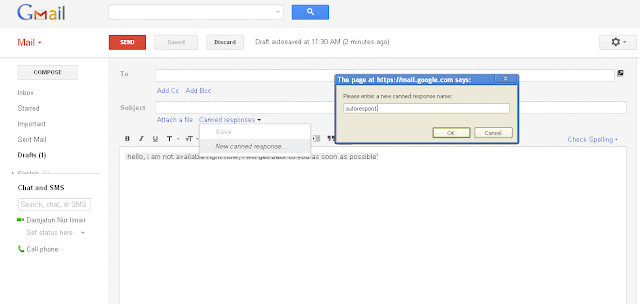
Compose new email for your autoresponde, its culd be like “hello, I am not available right now, I will get back to you as soon as possible'”
Click on Canned Responses and create new Canned Responses and type a name for your first auto responder such as “autorespon1”than save it


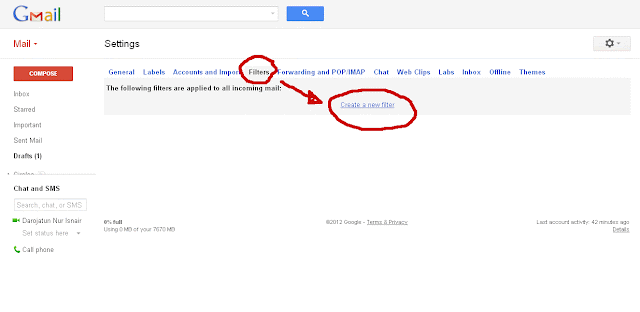
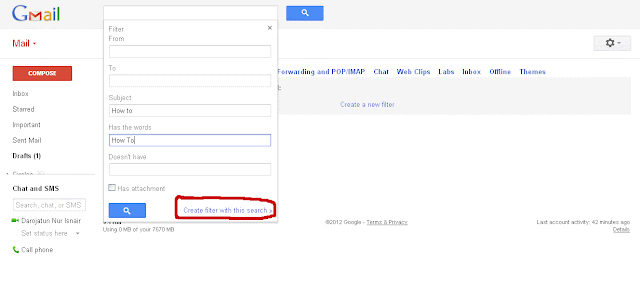
Now back again to Gmail setting, on tab filter than click create new filter write down your subject keywords or has the words. Then click Create filter with this search


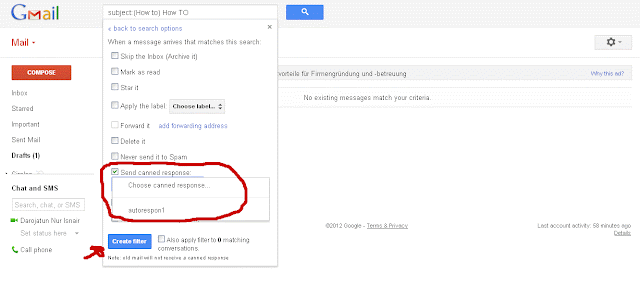
Then check the Send canned response, chose your Autoresponder replay and click create filter. 
All done now you have your own free Autoresponder with your own Gmail account. Every time you got an email with subject or has word match with your filter GMail will automatically answer it’s for you


Share it

twitter  facebook  google plus  linkedin 

Total Pageviews

Disclaimer

All the links and files in this website is not hosted by technoroots.in. If any blog or website having any query with the content we post, please contact us at support@technoroots.in

Softwares-Let's Explore The Software World | 2014

E:support@technoroots.inDeveloped By : Umang Patel Gadget Geeks