Showing posts with label How To. Show all posts

Wednesday, 21 December 2016

Trick To Run Trial Version Software For Lifetime

Hello geeks, technoroots is now back once again with all new cool tricks and latest updates of computer and cyber world. Today we are going to show you one cool trick which is extremely useful for the users who frequently use new software tools just like me.

Now a days, lots of new software and tools are being released everyday. but we can not purchase all of them because they cost a lot so we always end up using just the trial version of that software or tool and at the end of trial period you need to uninstall them. what if i tell you that you can use that trial version for the life time without paying any money. even after trial period gets expired. yes that's true my friend, today i am going to show you a cool trick which will allow you to use the trial version of any software for lifetime. so lets start.  

Follow Instructions to work this for lifetime

Tip 1: Note down the date on which you installed the software which you want to use lifetime

Tip 2: Once Trial of that software expires, you need to run that software from RunAsDate everytime.

Tip 3: You should not run software directly after trial expires. If you do so this trick will stop working.

How To Use RunAsDate Tools

Step 1: download the RunAsDate tool. download now

Step 2: open RunAsDate from the downloaded zip file.

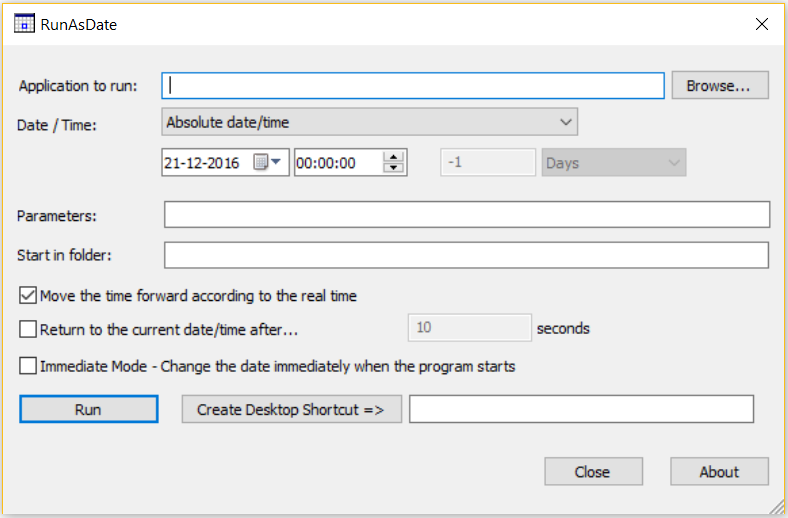
Step 3: Browse the application for which you want to run for the lifetime.

Step 4: Enter date and time on which you installed that application.

Step 5: Now click on Run to run your software. do this every time you want to run your application forever.

that's it guys now you can enjoy your favorite software for lifetime.


Tuesday, 25 February 2014

How to Send Profile Pics in Facebook Chat


Facebook is rolling out new features continuously. Recently they overhauled the complete profile view by enabling Timeline. Now they also enabled images in facebook chat. These images mean you can send profile pic of a facebook user in chat. The user may or may not be in your friend list. You need to have the User Id or Username of the user.


How to Send Profile Pics in Facebook Chat:


  • Login to your Facebook Account
  • Visit the profile of the user or group whose image you want to send.
  • Copy the Username or User ID from address bar.
  • Now in chatbox type he username or user id in following format: [[Username]] or [[User ID]]

For Sharing the picture of Mark Zukerberg or ladygaga type [[zuck]] and[[ladygaga]]

Monday, 24 February 2014

How to create Autoresponder with Gmail

If you've ever sent an email to support Team, most likely you received an automatic reply vaguely related to your message. Using a new feature from Gmail Labs, you can create your own Autoresponder with canned messages feature in Gmail and use them as automatic replies.
If you're bored of typing out the same email reply every time someone emails you with a common question, now you can compose your reply once and save the message text with the "Canned responses" button. Later, you can open that same message and send it again and again.

Canned feature in Gmail added a new action for filters: "send canned response". If you receive many messages about the same issue and you have a standard response, create a filter that includes some relevant keywords and select an existing canned response. This should come in handy if some users continue to ask same question repeatedly.

How to creating Autoresponder with Gmail:

First Login to your Gmail account
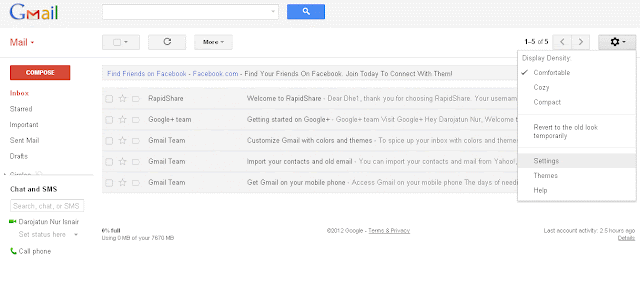
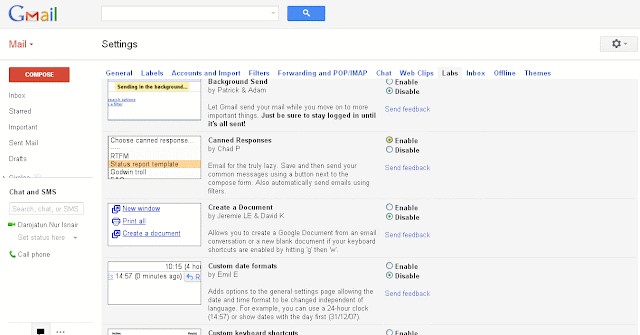
Go to setting and click tab Labs and check to enable Canned Responses feature than save it.


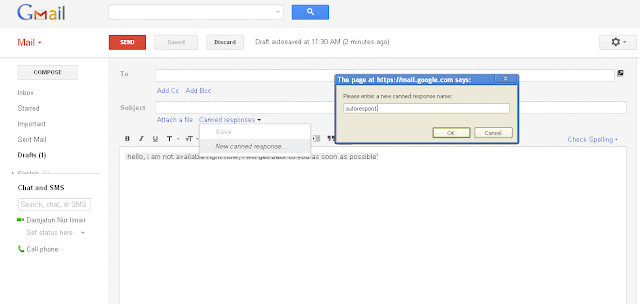
Compose new email for your autoresponde, its culd be like “hello, I am not available right now, I will get back to you as soon as possible'”
Click on Canned Responses and create new Canned Responses and type a name for your first auto responder such as “autorespon1”than save it


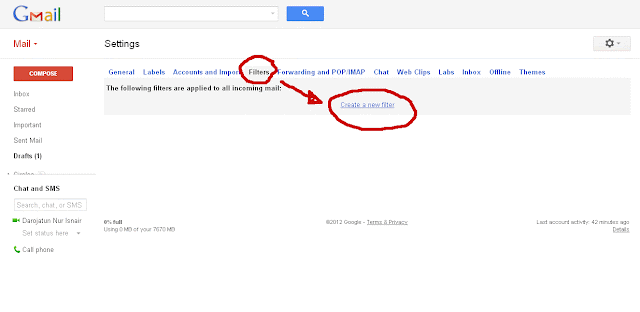
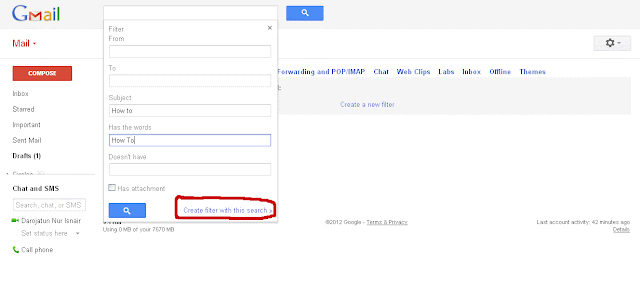
Now back again to Gmail setting, on tab filter than click create new filter write down your subject keywords or has the words. Then click Create filter with this search


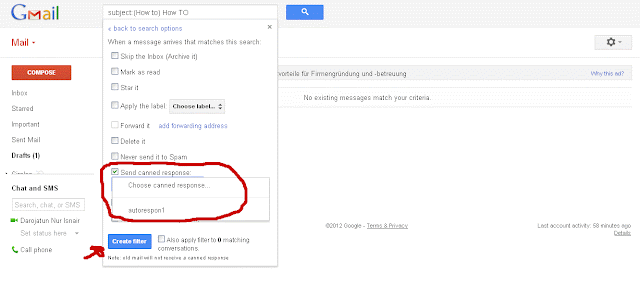
Then check the Send canned response, chose your Autoresponder replay and click create filter. 
All done now you have your own free Autoresponder with your own Gmail account. Every time you got an email with subject or has word match with your filter GMail will automatically answer it’s for you

Friday, 15 November 2013

How To Backup, Restore Install All Windows 8 System Drivers Free

How To Backup, Restore Install All Windows 8 System Drivers Free


The one thing we all dislike most is when we try to reinstall Windows OS is always to find the proper windows system drivers whether it is XP, Vista, Windows 7 or Windows 8. Without having all these system drivers your computer probably not function well and drivers are the most essential thing after installing a new OS. But the difficult part is to find the correct system driver for the Microsoft Windows Operating System. To get this done you need to visit the manufacture website of hardware and download and install all the drivers one by one and also this will take a lot of your time. In this tutorial we are going to show you a simple qucik method to check all your windows system drivers and backup them into a USB Pendrive or a DVD. With this way you can able to restore those drivers easily on your PC without searching, downloading and installing the drivers from the manufacture site.

Backup, Restore Windows System Drivers Using Double Driver 

Double Driver is a very simple and useful windows utility which will allow you to view all the windows system drivers currently installed on your PC and it also allows you to to backup, restore, print drivers details and save the chosen windows drivers. Double Driver search the windows drivers and give you the list of most important drivers info like version number, service provider, etc. All drivers which are found can easily be backup the driver software and easily restored whenever you want it. Double Driver is freeware windows system software. Which supports the following OS Microsoft Windows XP/Vista/7/8 (32-bit or 64-bit).

How To Backup, Restore Install in a USB Pendrive or a DVD

How To Backup, Restore Install in a USB Pendrive or a DVD
1.Download and install the free Double Driver windows software.
2.Run the application wait for it to search the drivers.
3.Select the drivers you want to take backup.
4.Click on Backup Now button.
5.It will show you the various file option to backup like structured folders, compressed ZIP archives and single file self-extract.
6.After the backup is done you can burn the zip folder in your pen drive or in your CD.
7.To restore the drivers just run the program that's it.
If you find any other free Backup and Restore Windows 8 System Drivers software's let us know in the comments.

Tuesday, 12 November 2013

How to sync your Windows 8.1 Start screen and desktop

The Start screen and desktop are still two totally different environments in Windows 8.1, but at least you can make them look the same.


Bouncing back and forth between the Start screen and desktop remains a jarring experience in Windows 8.1. But you can make the trip smoother by giving both environments the same look.
Windows 8.1 offers a new option that lets you keep the same background image onto the Start screen and desktop and even keep the two images in sync.

 Here's how to set it up:

1. Launch Windows 8.1, open the desktop, and then right-click on the Taskbar.
2. Select Properties from the popup menu.
3. In the Taskbar and Navigation properties window, click on the Navigation tab.
4. Check on the option to Show My Desktop Background on Start. Click OK.
5. Return to your Start screen, and you'll now see the same background that appears on your desktop.

Change your desktop background anytime down the road, and your Start screen background changes as well. As a bonus, your Apps screen also gets the same treatment.

Friday, 8 November 2013

Windows 8.1 Working Activator: A New Way Of Activation


hi folks, as we all know Windows 8.1 has released a few days ago. many of you guys wants to use it but its too costly too buy and there is not any proper activator available in internet. but here i m going to share a working activator which can activate your windows 8.1 for life time.

you just have to follow some simple steps to activate ur windows 8.1. its totally a new way of activating windows 8.1 so don't loose hope if u fail once keep trying again and again.

Steps :-

1. Download activation Package for below Link.
    Click here to Download

2. Follow the steps mentioned in video and text file.
3. Enjoy the features of windows 8.1.
 

===============================================================
Remember : I m not responsible of any type of software piracy. I m just sharing this activator i m not responsible for any type of harm or damage. any illegal activity. 
===============================================================

Wednesday, 30 October 2013

How To Boot Into Safe Mode On Windows 8

image


One of the most common steps when troubleshooting a PC is to boot into safe mode. For a long time this has been achieved by pressing the F8 key, this all changes with Windows 8 and its Automatic Repair mode. But what if we want Safe Mode?
You can still have Safe Mode, however, it is buried deep into the recovery options of Windows 8. While just mashing the F8 key as we all know will boot you into automatic recovery mode, you can still manually access the recovery options by pressing the Shift+F8 key combination.

Booting Into Safe Mode on Windows 8

The trick is to hold the Shift button and mash the F8 key, this will sometimes boot you into the new advanced “recovery mode”,  where you can choose to see advanced repair options.

You will need to click on the Troubleshoot option.

Now select Advanced Options.

Now choose the Windows Startup Settings option, by the looks of things we were never meant to find Safe Mode.

Finally hit the Restart button.

Like magic, when your PC reboots you will be able to boot into Safe Mode from the familiar looking Advanced Boot Options screen.

Getting To Safe Mode From Within Windows 8

You have a second option, however, this requires you to be booted into Windows already. Press the Win+R key combination and type msconfig in the run box and hit enter.

Switch over to the boot tab, and click on the Safe Boot check box.

You can also choose the type of Safe Mode you want to boot into:
  • Minimal is normal safe mode.
  • Alternate Shell is safe mode with command prompt
  • Network is safe mode with networking.
The Active Directory option pertains to restoring a server that is a Domain Controller for your network. Once you have chosen your option click the ok button and restart your machine.

You PC will be booted into Safe Mode automatically.

If you restart you PC you will just keep getting booted into Safe Mode, to stop this open msconfig again and uncheck the Safe Boot option, then hit the ok button.

Finally Restart your Machine.

That’s all there is to it. Be sure to follow us on Facebook
 

Monday, 21 October 2013

Automatically clear the history when you exit Windows 7

Want to clear your history automatically when you exit windows 7, there is a way to do it,

1. Press Windows logo button + R

2. Type "gpedit.msc" and press enter

3. Go to User Configuration > Administrative Templates > Start menu and Task Bar and on the right pane go to the second option "Clear history............" and double click on it.

4. Click on enabled and click OK. That's All!

How to restrict the installation of gadgets in Windows 7!


Want to restrict other users from installing gadgets to your computer! Then simply follow the3 steps given below,

1. Press Windows Logo button + R

2. Type "gpedit.msc" and press enter

3. Navigate to User Configuration > Administrative Templates > Windows Components > Desktop Gadgets and double click on the third option "Restrict unpacking and installation of......" and click on enabled. That's all!

Wednesday, 25 September 2013

Connect Wifi and Ethernet/LAN connection at the same time

You all must be wondering what is network bridge or how to use Wifi and LAN at the same time for accessing Internet.

As the name suggests, networking bridging , bridges your both the connections so that you can use them simultaneously. Refer Network Bridge Overview for further detailed info.
Following are the steps that can be followed to connect or bridge you Wifi and  Ethernet/LAN so that you can use both of them at the same time.


1) First connect the ethernet cable to your system.

2) Open Network and Sharing Center from the Control Panel.(Windows 7 and Vista)

3) At the left pane look for "Change adapter settings"

4) If you have connected your Ethernet cable or LAN cable and the if you have used your Wifi earlier, you will be getting options as given in the below screenshot.

5) Right click Wireless Network Connection and select Properties.

6) Click on the "Sharing tab" and uncheck the first option as shown in screenshot.


7) Do the same for the Ethernet/LAN connection's property, i.e. uncheck the 1st option in the sharing tab of the LAN connection's property.

8) Now, highlight both Wireless Network Connection and Local Area Connection by using "Ctrl" key and ,  then right click, and  select "Create Bridge" option from the list.

9) Wait for few seconds and Voila!!! You are good to go!!! 
You have successfully connected both of your connection together and your system will use Wifi and Ethernet/LAN connection at the same time.

install GNOME 3.8 on Ubuntu

Ubuntu 13.04 has recently hit and, from my perspective, it's a "raring" hit. And though I find Unity one of the finest user interfaces available, there are those that haven't had the same experience. For those people, I'm going to run a short series on installing other desktops, so you don't have to avoid the Ubuntu experience.

In this first entry, I'm going to illustrate how you can get the latest release of GNOME installed and running. It's not even remotely difficult -- but must be done through the command line.

Figure A
  • Easier application launch: When you view the application overlay, you will notice a new tab at the bottom -- Frequent/All (Figure A, click to enlarge). With this tab you can more easily find the apps you frequently open (without having to clutter up your launcher with too many apps).
  • Docs: Is the default document viewer for GNOME and includes built-in support for Google Docs.
  • Search optimization: From within the Search Settings pane (in the Settings tool), you can fine-tune search results.
  • Message Tray accessibility: Click Super+M to open and close the message tray and click Super+N to expand a notification.
  • Privacy: There's a new settings pane (in the Settings tool), where you can configure privacy and notification.
  • ownCloud support: Connect to your ownCloud account directly through the GNOME online accounts management tool.
  • Improved graphics rendering: You should find 3.8 to be a vast improvement over previous iterations of GNOME 3 in the way of graphics rendering. Video playback is much smoother and animations are seamless and slick.
If I've managed to tempt you enough to try, let's install.

Installation

Here are the steps for installing GNOME 3.8 on your Ubuntu desktop:
  1. Open up a terminal window.
  2. Add the GNOME PPA repository with the command: sudo add-apt-repository ppa:gnome3-team/gnome3
  3. Hit Enter.
  4. When prompted, hit Enter again.
  5. Update and install with this command: sudo apt-get update && sudo apt-get install gnome-shell ubuntu-gnome-desktop
  6. When prompted, select the login manager of choice (LightDM is the default Unity manager and GDM is the GNOME default -- either will work).
  7. When the installation completes, close the terminal and reboot the system.
  8. Select GNOME at the login screen and log in.
To test to make sure you have the latest version, open up a terminal window and issue the command gnome-shell --version. You should see something like GNOME Shell 3.8.1.

If u find any query related to this post...u can mention it in comment section....


Saturday, 14 September 2013

How to Copy Text From Image Using MS OneNote

Sometimes we come across a situation where we want to copy the text written on any image. copying the text from the image can be done using a program which u r using in daily life. I’ll show you to copy text from any image very easily just read and follow these given steps to copy text from any image and please share this post with your friends also to spread information.

Step 1

First of all you need Microsoft OneNote. It comes with Microsoft Office package. [ I am using Microsoft Office 2010]

Step 2

Now open Microsoft OneNote 2010.

Step 3

Copy-Paste any image to Microsoft OneNote 2010 from which you want to copy the text


Step 4

Now right click on pasted image and click on Copy Text From Picture as shown in below screenshot.


Step 5

Now open notepad or any your favorite text editor and press CTRL + V to paste text. That’s it . Enjoy & share with your friends. 

Thursday, 18 July 2013

How to surf free internet

Free Internet- Save money

This post is about how to browse internet for free. After going through lot of research work i have finally found a completely free way to surf internet.
This can be done through a software PD PROXY which provides free internet. All you need is mobile or net setter and make an account on there website and you can use free internet up to 100Mb/day.

STEPS

1. Sign up on http://www.pdproxy.com/signup.htm
2. Now, download the software from the website. Size of the software is just about 2  Mb.
3. Connect your net setter or phone with the computer via USB Cable.
4.It won’t work with wi-fi connection and you can’t make any ad-hock network through this.
5.The speed of the internet will depend on the Net Setter’s speed or operator’s speed.
6.Now, extract zip file and install it in your PC.
7.Launch PD PROXY through launcher.
8.Provide username and password of your account which you have created on www.pdproxy.com
9.Now, enjoy surfing internet for free upto 100MB/day.
10.Go on basic setting and select auto connect modem.

Hurry up, before they stop this facility.

This is the best option for the people who just surf internet. So why spent money when you get it for free through pd proxy. 

PLAY MOTION GAME IN WINDOWS 8 USING WEBCAM

As we know that Windows 8 is getting better and better day by day. it has some awesome collection of app and game on its own app store. But a few people who use windows 8 knows that it also support motion game using webcam.


There are few gaming consoles with motion detection features like Play Station Move and Xbox Kinect which allow us to play just with a motion controller and detector. But, the problem is that, these consoles are costly and everybody can’t have it. So, whats the alternative? Can the person with no gaming console can play the motion games? The answer is yes…!
Some of the interesting games are 3D Pinball Fx, Jetpack joyride etc . But here we will be talking about motion games that use webcam for the detection of motion.
The game is BALLSTRIKE and you can search it on the Store with the name BallStrike or you can visit the link below.

You just need to have a webcam to run this app. You simply have to stand in front of the camera. To clear levels of the game, you have to perform tasks like in which you use your body to twist, turn, kick, hit and jump to explode the balls.

Features of This motion game :

1. Its a Health fitness Game to burn your calories.
2.There are few levels of the game and if you like it, you can buy the Full version.
3.You will get augmented Reality Experience
4. It detects Motion via built-in Camera or attached Webcam.
5. It Calculates Burned Calories.

The amazing thing about this app is, it uses only Webcam as hardware which is very common. So everyone having webcam can try it. Also it shows the no of calories burned. So install the game and give a try yourself. You can share your crazy pictures through Facebook, Email and other social sites.

Download Ball Strike in Windows Store

Sunday, 14 July 2013

How to Measure Your Computer’s Security Performance

Increase Windows Security
You can find different applications to calculate & measure your PC graphics performance, its speed, memory, data transfer speed and lot more. But we don't have any other software to estimate and evaluate exactly how secure and protect our desktops are. If someone questions you how safe your computer is, you can start off telling the antivirus security software and anti-malware programs that you have installed but, this will not give you the security and safety measure. If you don't know what to be optimized in your system then you must install this software to give you some recommendation to improve your PC overall performance.

Check the Security Score of your Computer

OPSWAT Security Score is a free windows software which will run a scan in your laptop or computer to get the current status of your installed Antivirus security apps and it provides a score & rating and also tips or recommendations on how you can increase equally the score and the security measures of your PC. You can download and install the OPSWAT Security Score from their official website the size of the program is 5MB. This tools scans your firewall, hard disk encryption, patch management, antivirus, antiphising, public file sharing and backup,


How to Measure Your Computer’s Security Performance


OPSWAT Security Score Software

After Installing the OPSWAT Security Score at the first time you have to run a scan this can take a while so be patient. After the scan is complete you can get a overall score of your PC performance. The Green shade indicates no need any changes,the Grey shade indicates need some changes and the Red shade indicates must need changes. You can click on the chart's and see which part is need to be improved to get a high score. By clicking the i icon OPSWAT gives you some tips to boost up the performance. By getting the higher score you can steadily increase your computer performance.

Thursday, 4 July 2013

How To Try & Experience or Test Drive the Samsung Galaxy S4 Online


How To Try & Experience or Test Drive the Samsung Galaxy S4 Online
Samsung Inc launched its flagship smartphone, the Samsung Galaxy S4 late back in March 2013 and now the device is currently available for purchase in most of the countries for the price tag of $760. Samsung Galaxy S4 is recognized as one of the most ultra powerful smartphone on the market with outstanding hardware and it's software features. Galaxy S4 operates the newest version ofAndroid 4.2 Jelly Bean, but S4 not using the stock Android they customized the 4.2 JB called Touchwiz. Galaxy S4 additionally includes a lot of new features and apps.

What is The Use of Trying Samsung Galaxy S4 Online?

So just in case you are interested in buying the phone and cannot test drive the mobile at a regional retail store, or you are too lazy to go find an store to try the S4. Samsung has offered an online web simulator to check and test drive the brand new Samsung Galaxy S4. This method is time saving and you can explore the features in a new modern way.

How To Test Drive the Samsung Galaxy S4 on the Web

How To Test Drive the Samsung Galaxy S4 on the Web
All you have to do is visit the online Samsung Galaxy S4 simulator and it starts loading, after loading you can find a list of menus at the bottom where you can test drive the latest features of S4. If you do know how to use the simulator they give an easy tour guide by selecting the first Using the Simulator menu. The online simulator uses flash player.

Explore All the Features of Samsung Galaxy S4 Online

In the Second menu Basic Functions you will find some of the cool features of S4 like Smart Screen, Air view, S voice which is like an Google Voice, and you can try lot more settings with the step by step instructions in the left side and in the right side you will see the Galaxy S4 in black. I wonder why they don't have the option to choose between colors like white and black. But anyway try this out.

How To Increase The Speed Of Computer Games


A free Microsoft windows game booster services that allows you to quickly remove your delaying PC to its uncover requirements intended for game playing. This improves the over-all accelerate your game performance which includes frame rate drops and lag spikes as well as alt tabbing out of games faster and more responsive gaming. 


This performs as a result of your  computer no longer getting any needless overhead working tasks not required although for gaming. Helps your CPU, RAM and your Internet connection

Returning your PC back again to its former simply by  pressing the Restore button or even this takes place instantly on your next restart.

Totally safe along with no permanent modifications made to your computer. 
Operating Systems Supported

  1. 1.Microsoft® Windows® 7 (32-bit and 64-bit) Starter/ Home 

      Basic/Home  Premium/Professional/Ultimate

    2.Microsoft® Windows® Vista (32-bit and 64-bit) Starter/Home 

  2. Basic/Home Premium/Business /Ultimate

    3.Microsoft® Windows® XP (32-bit and 64-bit) with SP2/SP3 or 

  3.    Home/Professional/Media Center

  1. Hardware Requirements

    1. 300 MHz processor or faster processor

      256 MB of RAM

    2. 30 MB of free hard disk space


  • With regard to more detail start looking at GBoost
  • How To Recover Stolen Laptop Mac Windows Linux iPhone iPad Android


    You stored all your projects, data files,images,videos etc.. on your Laptop or Mac or Windows or Linux or IPhone or iPad or Android.What if things get messed up you lost any of those device mentioned here in some public places.Your stored data's are misused by some other strangers

    Prey Project Complete Review

    Prey enables you to continue to keep track and record of your phone or laptop constantly, and it can assist you to locate your missing,thieved,robbed devices. It's light and portable, open source software, and free for everyone to make use of it.

    Exactly How The Application Works

    Quiet but lethal.Simply you install a small Setup into your PERSONAL COMPUTER or mobile phone, which in turn silently wait around to get a remote signal to wake up and perform its wonder.

    This signal transmission is routed possibly through the Internet or via SMS text message, and allows for one to collect information and details in regard to the gadget's specific location, hardware as well as network status, and optionally result in particular actions on it.

    Key Features Of Preyproject

    100% Geo Location

    Alert using GPS and WiFi and gives exact place.

    Know The Thief

    Who stolen your gizmo by taking a snapshot using webcam and monitor him and Freeze down your PC and Tablet

    Not Able To Use

    Except if an unique security password is entered. The dude can't even have the ability to execute a thing!

    Wifi Autoconnect


    In case enabled Prey will look up for the nearest closest WiFi hotspot whenever no Internet connection is available

    Check Out Their Activities


    Get a screenshot of the active session.In case you are lucky enough to capture the guy logged into his email or Facebook account!

    Receive A Full Report


    Of your PC's CPU, motherboard, RAM, and BIOS information. Works great when used with Active Mode.

    Protect Your Computer


    Data risk-free Hide out your Outlook or Thunderbird data and stored passwords

    Automatic Updater


    Prey can easily examine its present version and automagically get and update by itself, which means you no require to manually reinstall on every occasion.

    PreyPro Review


    What if you are running a organisation having lot's of computer how to track of huge systems?
    Don't worry PreyPro version also available there to track your whole unit system but it cost according to the number of systems you want to track

    Note:For normal Prey account you can only track 3 devices


    Share it

    twitter  facebook  google plus  linkedin 

    Total Pageviews

    Disclaimer

    All the links and files in this website is not hosted by technoroots.in. If any blog or website having any query with the content we post, please contact us at support@technoroots.in

    Softwares-Let's Explore The Software World | 2014

    E:support@technoroots.inDeveloped By : Umang Patel Gadget Geeks